When it comes to working on the abs, I prefer to do planks. I like the endurance challenge planks provide. I like to see how long I can hold the plank before tiring out. I also like to pepper in 30 seconds of plank in-between sets of resistance work or high-intensity cardio exercises. Planks are also great because they don’t place as much stress on your lower back like other ab workouts can. I used to do Russian twists and windmills often, but found them difficult after a lower back strain. I replaced those with some of the exercises I’ve shared below.
Plank Form
The key to a proper plank is to keep your body in a straight line from your head to your heels. You can keep your arms straight or place your forearms on the ground. If that’s too difficult, drop your knees and keep a straight line from the head to the tailbone. In any circumstance, make sure to engage your core. Concentrate on drawing your navel to your spine. Don’t suck your stomach inward, that may cause your back to bow.
Ten Plank Variations
Below I’ve listed my ten favorite plank variations. Give them a try! I’d recommend trying up to half in a session to avoid overworking and to spice up your routine.
SHOULDER TOUCH

From the standard plank position, touch one shoulder with the opposite hand. Focus on keeping still and not wobbling. This is where engaging your core will truly help in regards to balance. It’s very easy to wobble, but if you pay attention to what your body is doing, you’ll be able to stay firm.
SIDE PLANK

Start on one side of the body. Keep one elbow perpendicular to the ground with your shoulders aligned. Keep your body in a straight line, from head to heels. If you can, make sure you can see your reflection. Your body should look like it’s a right triangle. Try to keep your body from leaning forward. For added difficulty, put the hand of the side you’re on down instead of your elbow. For even more of a challenge, lift your top leg in the air.

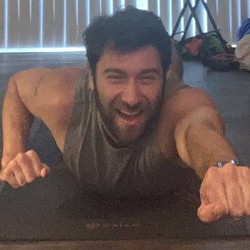
HOVER PLANK

Get your hands and knees on the ground in a tabletop position. Lay the tops of your feet down. Use your core to pull yourself up.
CHATURANGA PLANK

Yogis engage! From a straight arm plank, lower your body until your arms are in line with your ribcage. If you need to, you can always do this while on your knees.
Y- OR X-PLANK
From a regular plank position, move your legs out until they are wider than hip-width apart. That is the Y-Plank position. If it is within your ability, move your arms out until they are wider than shoulder-width apart, the X-Plank position.
BIRD DOG PLANK

Challenge your balance by lifting one arm straight out in front of you while lifting the opposite leg up behind you. Make sure to switch sides! I prefer to do this position with my forearms on the ground as opposed to a straight arm, but nothing’s stopping you from trying the straight arm position!
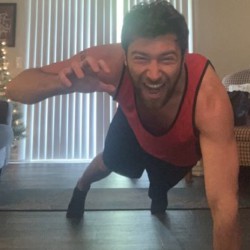
GRASSHOPPER PLANK

Like the grasshopper push-up from last week, you’ll be drawing a knee to the opposing elbow. Keep your body in a straight line and your core engaged!
WALK THE PLANK

From the standard plank position, have your arms either straight or your forearms bent. You will be transitioning to the alternate position one arm at a time. So for example say you start with your arms straight. You’ll bring your left arm down to your left forearm, followed by your right arm down to your right forearm, then straighten your left arm, and finally straighten your right arm. Make sure to follow a rhythm.
HIP DIPS

Start in a standard plank position. I recommend having your forearms on the ground. Lower your hips to one side of the ground in a controlled manner and maintain that control when you bring your hips back up to a plank position.
PLANK JACKS
Keep your plank in a standard position. Kick your legs out and back in like you’re doing jumping jacks. Keep control by making sure your core is engaged! Try to make sure your hips don’t rise. It’s tough but it helps to work your core.
When it comes to duration of the hold, start slow. Start by holding for 20 seconds and add a few seconds every session.
An important thing to note is that when you’re working your core, don’t neglect the muscles of your lower back. The core is not just your abs! Neglecting the erector spinae and multifidi can result in relying on ligaments and other connective tissue for spinal support which can lead to back pain. Next week, I’ll feature some good exercises to help work out the lower back. In the meantime, if you have any questions please reach out!
Check back next week for another installment of Wellness Wednesdays With Patrick!
Disclaimer: Always consult a physician before starting an exercise routine. Nash In Tune is not responsible for any injuries. Stay smart and stay safe!
Explore Fitness
- Wellness Wednesday With Patrick #5: Squats and Prayers

- Wellness Wednesday With Patrick – Week 4: Take It On Back
- Wellness Wednesdays With Patrick – Week 3: Plank U, Next

- Wellness Wednesdays With Patrick – Week 2: Push-Up or Shut Up!
- Wellness Wednesdays With Patrick – Week 1: Balancing Act
- Crush Your Fitness Goals With These Free Home Workouts
Wellness plank